How Borrowed Chords Transform Emotional Tone in Modern Songwriting

Open sheet music resting above the blurred keys of a piano

Why Familiar Pop Progressions Need Harmonic Friction

Four-chord loops are efficient, memorable, and remarkably flexible. That is precisely why they appear everywhere in modern pop, rock, electronic music, and film-influenced songwriting. Yet efficiency can become predictability. When the same diatonic movement repeats without a meaningful change in color, the listener may understand the pattern before the song has finished expressing its idea. The melody can still be strong, but the harmony no longer creates enough movement beneath it.

Borrowed chords offer a focused solution. Instead of abandoning an accessible progression or forcing a complete key change, you can replace one familiar chord with a chord from the parallel major or minor scale. This technique, often called modal interchange, works like an instantaneous emotional color switch. A major-key chorus can suddenly sound wistful, wounded, mysterious, or cinematic, while the underlying tonic remains clear. The result is harmonic friction with a controlled footprint: enough surprise to renew attention, but not so much disruption that the melody loses its home.

The Mechanics of Borrowing Without Getting Lost in Theory

In plain English, parallel keys share the same starting note but use different collections of notes. C major and C minor are parallel keys because both begin on C, even though their scales create very different emotional environments. A songwriter working in C major can briefly borrow a chord from C minor, then return to the original progression. The tonal anchor stays in place while the emotional landscape changes.

This is different from moving between relative keys. C major and A minor are relative keys because they contain the same notes and share a key signature. Moving between them can feel subtle, since the available pitch material remains largely unchanged. Parallel-key borrowing is more dramatic because it introduces altered notes. A lowered third, sixth, or seventh can instantly challenge the listener”s expectation while the bass and surrounding chords continue to suggest the original key.

That chromatic detail is the practical heart of the technique. A single note outside the scale can create a strong psychological response because listeners have learned to anticipate the diatonic version. The surprise is especially effective when the altered note moves smoothly by semitone into a familiar chord tone. A concise overview of the practice appears in this guide to borrowed chord technique, but the most useful lesson is simple: use the ear to identify the emotional change, then use theory to understand why it works.

  • Keep the tonic and overall tonal center recognizable.
  • Borrow one chord at a time before experimenting with longer modal passages.
  • Listen for the altered chord tone, not only for the chord label.
  • Return to familiar harmony when the emotional point has landed.

The Minor iv Chord and the Sound of Sudden Nostalgia

The minor iv is one of the most reliable borrowed chords in a major key. In C major, the normal IV chord is F major, made from F, A, and C. Borrowing from C minor changes it to F minor, made from F, A-flat, and C. The root and fifth remain stable, but the major third drops to a minor third. That one pitch creates a distinctly tender ache, often suggesting regret, memory, disappointment, or a moment of emotional vulnerability.

The effect becomes even more powerful through voice leading. In a common progression such as IV to iv to I, the third of the major IV chord, scale degree 6, descends chromatically to flat-6 in the minor iv and then continues toward scale degree 5 in the tonic chord. In C, that movement can be heard as A to A-flat to G. The bass may remain steady or move conventionally, while the inner voice performs a tiny downward lament. This is why the progression can feel emotionally large despite changing only one chord quality.

Academic explanations of the technique describe mode mixture as the tactical use of lowered scale degrees from a parallel mode. The Music Theory for the 21st-Century Classroom specifically highlights the lowered sixth as a characteristic color of borrowed harmony. For songwriting, the terminology matters less than the application: place the minor iv directly before the tonic when a lyric, vocal lift, or production drop needs a concentrated dose of nostalgia.

  1. Establish the major-key environment with I, IV, or V.
  2. Change IV into minor without changing its root.
  3. Resolve the minor iv to I and let the chromatic inner voice carry the emotional weight.
  4. Try the substitution in a pre-chorus, final chorus, bridge, or last repetition rather than on every cycle.

The Flat-VI and Flat-VII for Epic Cinematic Shifts

The flat-VI major chord creates a broader and more cinematic form of modal color. In C major, A-flat major replaces the expected A minor chord built on scale degree 6. Because the chord contains A-flat, C, and E-flat, it introduces two lowered notes from the parallel minor. The effect can suggest grandeur, distance, danger, wonder, or release. It often feels larger than the minor iv because the entire chord arrives with a change in harmonic scenery.

The flat-VII offers a different kind of momentum. In C major, B-flat major replaces the diatonic B diminished chord. Unlike the dominant G major or G7, B-flat does not insist on resolving directly to C. That lack of traditional dominant pressure makes it especially useful in rock, indie, alternative, and soundtrack-oriented writing. A progression such as I to flat-VII to IV can feel open and driving, while I to flat-VI to flat-VII to I can create a wide, anthem-like arc.

Standard major-key movement Borrowed alternative Typical impression
I to IV to V to I I to iv to V to I Familiar momentum with a bittersweet turn
I to vi to IV to V I to flat-VI to flat-VII to I Cinematic scale and anthemic lift
I to ii to V to I I to flat-VII to IV to I Rock-oriented drive with less dominant tension
IV to I flat-VI to I Unexpected drama followed by a clear return home

Use these chords with attention to arrangement density. A flat-VI played by a full orchestra, distorted guitar, or layered synthesizers can sound monumental, while the same chord on a lightly voiced piano may feel intimate and suspended. Voicing also determines how aggressively the borrowed color registers. Keeping common tones between neighboring chords produces continuity; spreading the altered notes across octaves makes the shift more conspicuous.

Integrating Borrowed Harmony into Your Writing Routine

Borrowed harmony becomes most useful when it enters the normal writing process rather than being added as decoration at the end. Begin with a progression that already supports the melody. Then test one substitution at a time, recording both versions at the same tempo and arrangement level. The comparison makes the emotional change easier to judge than abstract analysis alone.

Close-up of hands forming chords on an acoustic guitar fretboard
Small chord changes can transform a familiar progression, giving a song a new emotional direction without losing its tonal center.
  1. Test minor iv before the tonic. If a chorus currently moves IV to I, replace IV with iv for one repetition. Check whether the lyric becomes more intimate or whether the new chord competes with the intended message. A sustained vocal note over the chord may need to change if it contains the raised sixth that the borrowed chord lowers.
  2. Use flat-VI as a bridge pivot. Place flat-VI at the end of a verse or in the first bar of a bridge to reset the listener”s attention. It can also move the vocal into a new register, especially when the melody rises over the chord”s major third or fifth. Keep the following harmony clear so the passage feels purposeful rather than like an accidental key change.
  3. Audit the melody against altered scale degrees. The accompaniment may contain flat-6, flat-3, or flat-7 while the vocal still sings the major-key version. That clash can be expressive, but it can also sound unintended. Sustain, resolve, or rewrite the affected melodic note according to the desired tension.

Production choices should reinforce the harmonic event. A borrowed chord does not always need a larger arrangement; sometimes the strongest effect comes from removing drums, narrowing the stereo image, or exposing the altered note in a middle instrument. Conversely, a flat-VI can support a dramatic expansion if bass, pads, and vocal harmonies all acknowledge its new color. The guiding principle is proportion. The harmony should change the emotional lighting, not obscure the scene.

Expand Your Emotional Palette Beyond the Diatonic Sandbox

Modal interchange is best understood as an emotional vocabulary rather than a set of rigid academic rules. The minor iv can compress a complicated memory into one aching turn. The flat-VI can make a familiar chorus feel suddenly enormous. The flat-VII can remove the expected dominant pull and replace it with forward motion that feels more physical, open, and less resolved.

Start with a song already in progress and make the smallest possible experiment. Replace one IV with iv, or one diatonic vi with flat-VI for a single phrase. Keep the melody, tempo, and production unchanged, then listen for what the chord has revealed. Once the effect is clear, refine the voicing, bass movement, and vocal line rather than adding more borrowed chords automatically.

  • Use minor iv for intimacy, nostalgia, and emotional ache.
  • Use flat-VI for cinematic breadth, gravity, and wonder.
  • Use flat-VII for propulsion, openness, and rock-oriented lift.
  • Let voice leading explain the feeling before adding theoretical complexity.
  • Study contemporary songs critically and listen for the exact moment a familiar major-key palette turns darker or more expansive.

The most effective borrowed chords rarely announce themselves as theory. They arrive as a brief change in emotional weather, then leave the listener with a stronger sense of the original home key. That balance is the technique”s lasting value: a small harmonic decision can make a predictable loop feel newly alive.

The Architecture of Acoustic Treatment for Small Rooms: Balancing Clarity, Space, and Real-World Physics

Close-up of a wooden acoustic diffuser wall with staggered blocks

Rethinking the Small Room Acoustics Dilemma

Small rooms are often treated as acoustic problems to be covered rather than understood. The familiar response is to attach foam to every available surface until reflections disappear. The result may look like a studio, but it can sound worse: unnaturally dull, tonally unbalanced, and strangely fatiguing. Thin foam can reduce some high-frequency reflections while leaving the most disruptive low-frequency resonances almost untouched. A room that has lost its useful acoustic life is not automatically an accurate room.

The first distinction is between soundproofing and acoustic treatment. Soundproofing attempts to reduce sound transmission through walls, ceilings, doors, and floors. That requires mass, airtight construction, decoupling, and structural planning. Acoustic treatment works inside the room. It controls reflections, modal decay, resonance, and stereo imaging so that the sound reaching the listener is more trustworthy. The objective is not silence. It is controlled acoustic energy, with enough liveliness to preserve musical scale and enough restraint to prevent the room from rewriting the mix.

Illustration of a desk, seated person, and acoustic panels in a small room
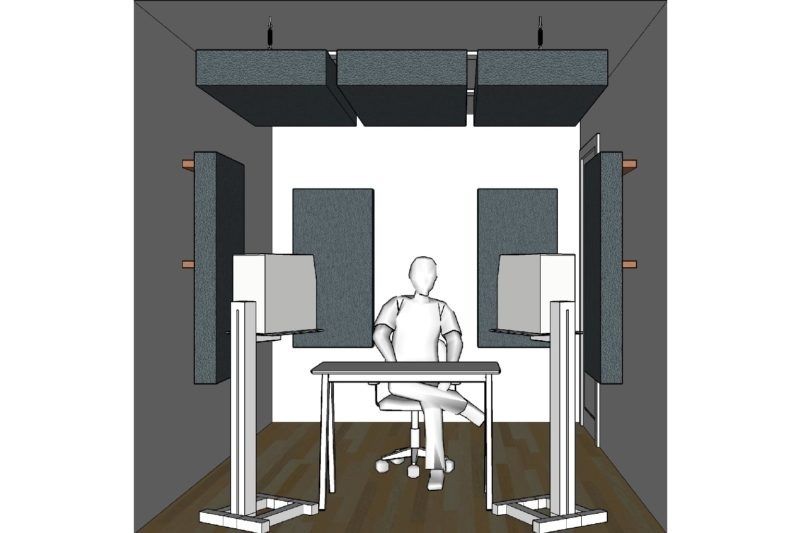
A compact monitoring room works best when treatment is planned around the listening position, reflection paths, and low-frequency behavior-not added at random.

Understanding Room Modes and Standing Waves in Confined Spaces

Room modes are resonances created when sound reflects between boundaries. At certain frequencies, the distance between walls, floor, or ceiling supports repeated reinforcement. The reflected wave returns in phase with the outgoing wave, producing a standing pattern of pressure peaks and nulls. A listener may hear a bass note as exaggerated in one position and nearly absent only a short distance away. These changes are not caused by the loudspeaker alone. They are consequences of the room”s dimensions and the listener”s location.

Rectangular rooms contain axial modes involving two opposing surfaces, tangential modes involving four surfaces, and oblique modes involving all six. Each mode has higher-order variations as additional wavelengths fit between boundaries. This is why small rooms can sound uneven even when their dimensions appear reasonable. There is no perfect room ratio that eliminates every mode, and changing the shape does not abolish resonance. It merely redistributes where resonances occur. The practical goal is to reduce excessive buildup and shorten modal decay, not to chase complete cancellation.

The most aggressive pressure zones occur at boundaries, particularly where multiple surfaces meet. This is the physical reason the room corners deserve attention before decorative wall panels. Useful diagnosis can include measurements from several listening positions, a sine sweep, or carefully controlled pink-noise tests. A measurement does not replace listening, but it helps distinguish a persistent modal problem from a speaker-placement issue or a narrow listening-position null. For a concise explanation of how standing waves alter bass response in compact studios, the key principle is simple: frequency response and decay are related, but they are not identical problems.

  • Axial modes are usually the strongest and easiest to identify.
  • Nulls can be caused by cancellation and may not be fixed by adding absorption at the listening position.
  • Modal ringing can remain audible after the initial bass transient has stopped.
  • Speaker and seat placement should be adjusted before treatment is used to compensate for avoidable geometry.

Targeting the Low End with Strategic Corner Bass Traps

Porous absorbers work by converting air motion into heat through friction. Their efficiency depends on the movement of air through the material, which means placement matters. At a rigid wall, particle velocity is low while acoustic pressure is high. A porous panel placed directly against that wall may still be useful in the midrange, but it is not taking full advantage of the absorber”s velocity-based mechanism at low frequencies. Thickness and distance from the boundary become increasingly important as wavelength increases.

Corner treatment is therefore a high-impact starting point. Wall-wall-floor and wall-wall-ceiling intersections combine boundary pressure zones, while floor-to-ceiling treatment in the four vertical wall corners addresses a broad range of modal behavior. If space or budget is limited, prioritize the front corners symmetrically, then expand treatment rather than placing isolated panels randomly. Large broadband traps with substantial depth generally provide more useful low-frequency control than thin decorative products.

An air gap behind a panel can improve performance because the absorber interacts with air motion farther from the rigid boundary. The quarter-wavelength idea is a useful guide, not an absolute installation law. A gap of several inches can improve lower-frequency absorption, but it does not transform a thin panel into a true subwoofer trap. Extremely low frequencies may require thicker porous structures or purpose-built membrane and diaphragmatic absorbers. The best installation balances acoustic benefit with access, ventilation, fire safety, and the room”s everyday function.

  • Begin with the four vertical wall corners where possible.
  • Use deep broadband material rather than relying only on thin foam.
  • Leave an air gap when the construction allows it and the panel remains secure.
  • Measure decay and frequency response after each major change.

Material Comparison for Effective Acoustic Absorption

Material choice affects more than appearance. Open-cell polyurethane foam is lightweight, affordable, and convenient for treating selected high-frequency reflections. Its limitations become clear in the low-mid and bass ranges, where meaningful absorption requires considerable thickness. Dense rockwool and rigid fiberglass generally offer better broadband performance when built into thick panels or corner traps. They can control lower frequencies more effectively, although their performance depends on density, thickness, mounting distance, and the specific product.

Panels should be wrapped in acoustically transparent fabric and constructed so that fibers cannot escape into the room. Rockwool is naturally non-combustible in many product grades, while fiberglass boards offer a rigid, efficient format that can be easier to frame. Always check the manufacturer”s fire classification and handling guidance rather than assuming that every product in a material category behaves identically. A practical comparison of high-density mineral wool cores to standard polyurethane options reinforces the main point: thickness and construction are as important as the name printed on the package.

Material Strengths Limitations Best use
Open-cell acoustic foam Lightweight, inexpensive, easy to shape Limited low-frequency control, variable durability Selective high-frequency reflection control
Rockwool Broadband potential, non-combustible product grades, suitable for deep traps Requires careful wrapping and installation Corner traps and thick broadband panels
Rigid fiberglass Efficient for its thickness, rigid, easy to frame Higher cost and protective handling requirements First-reflection panels and broadband absorbers

Pinpointing First Reflections Using the Mirror Method

First reflections are the early arrivals that bounce from side walls, the ceiling, or nearby surfaces before reaching the listener. When they arrive close enough to the direct sound, they can blur stereo localization, weaken phantom-center stability, and create comb filtering through phase interaction. The effect is often subtle at first: vocals feel less anchored, panning decisions become uncertain, and midrange detail seems to change when the listener moves slightly.

The mirror method provides a practical way to locate side-wall reflection zones. It identifies the point where a listener can see a loudspeaker”s relevant radiating area from the listening position through a mirror placed against the wall. The goal is not to decide whether only the tweeter, cone, or cabinet must appear. The reflection path depends on the speaker”s dispersion and the frequencies being considered. Treating a sufficiently broad area around the visible speaker position is more reliable than targeting a tiny visual point.

  1. Place the listening chair and speakers in their intended working positions, with left-right symmetry as close as possible.
  2. Ask a listening partner to move a small mirror along the side wall at seated ear height.
  3. Mark the position where the speaker becomes visible from the listening seat, then repeat the process on the opposite wall.
  4. Mount thick, broadband panels over the marked zones, extending beyond the narrow point when practical.
  5. Repeat the process on the ceiling to locate the vertical reflection path and install a cloud directly above the mixing position.

Panel placement should preserve symmetry. If the left wall receives a large absorber at the first reflection point, the right wall should receive an equivalent treatment whenever possible. The ceiling cloud deserves particular attention because vertical reflections can combine with desk reflections and create a dense cluster of early energy. A cloud should hang securely, with a meaningful air space above it, while maintaining safe clearance from lighting, ventilation, and the listener.

Balancing Absorption and Diffusion for a Natural Soundfield

Absorption removes acoustic energy by converting it into heat. Diffusion does something different: it scatters reflected energy across time and direction without eliminating it. This distinction matters in a small room. Absorption is highly effective at reducing strong first reflections, flutter echo, and excessive reverberation. Diffusion can preserve spaciousness while preventing a hard, focused reflection from returning directly to the listener.

Pure absorption can create an unnerving environment. The room becomes quiet but not necessarily accurate, with a short, uneven reverberation profile and a sense that high frequencies have vanished while low-frequency problems remain. Long sessions in such a space can be fatiguing because the listener loses natural acoustic cues. A balanced room usually combines bass control, targeted broadband absorption, and carefully selected scattering surfaces. As acoustic treatment guidance makes clear, diffusion is not a substitute for absorption, and absorption is not a universal solution.

In smaller rooms, diffusion belongs where sufficient distance exists for scattered reflections to develop before reaching the listening chair. The rear wall is often a candidate, provided the diffuser has suitable depth and the room is not so short that its wells or facets create strong nearby coloration. A bookshelf can provide irregular scattering, but it is not a calibrated diffuser. Use it as a helpful secondary feature, not as a replacement for measured treatment. Keep the front of the room controlled and maintain symmetry around the listening axis, then introduce diffusion where it adds depth without producing a new cluster of early reflections.

  • Absorb first reflections that compromise imaging.
  • Use bass traps to manage buildup and decay rather than expecting thin panels to fix deep nulls.
  • Reserve diffusion for surfaces with adequate listening distance.
  • Retain some controlled liveliness so music remains spacious and engaging.

Building an Accurate and Inspiring Sound Environment

Small-room optimization is an iterative process, not an overnight installation. Begin with speaker placement, listening position, and left-right symmetry. Establish a baseline with familiar recordings and simple measurements, then address the highest-impact problems in order: dominant low-frequency buildup, first reflections, ceiling reflections, and the rear-wall response. Each change should be evaluated from the working seat and from a few nearby positions, because a treatment that improves one location can expose a different problem elsewhere.

The most successful room is not the room with the most panels. It is the room that lets decisions translate reliably while still feeling like a place where music belongs. Deep corner traps, properly mounted broadband absorbers, a well-positioned ceiling cloud, and restrained use of diffusion can deliver dramatic gains without turning a domestic interior into an industrial box. Good acoustics respect both physics and daily life: clarity for the engineer, comfort for the listener, and enough natural energy for the room to remain inspiring.

Before the Lights Go Up: 5 Backstage Habits to Calm Stage Fright Fast

Performer peers through red stage curtains before an entrance

The Biology of the Final Ten Minutes

The final ten minutes before a performance can feel strangely physical. Your pulse accelerates, your hands become unsteady, your mouth dries, and your attention narrows until every possible mistake seems immediate. A presenter may reread the opening sentence for the tenth time. A musician may feel the instrument slip slightly in the hands. An actor may experience a sudden blankness despite knowing the lines. These sensations are not evidence that you are unprepared or incapable. They are the visible effects of an adrenaline surge preparing the body to act.

The fight-or-flight system increases heart rate, changes breathing patterns, redirects blood flow, and raises muscle readiness. It is designed to help you respond quickly, not to make you feel comfortable. Trying to argue with that response through willpower alone often adds another layer of tension. The more useful approach is immediate and physical: regulate breathing, reconnect with sensory information, release constriction, and give the energy a more accurate label. The following five-minute protocol is not psychotherapy. It is a practical backstage reset for the moment when your body needs direction before your thoughts can catch up.

Musician facing bright stage lights with a bass guitar and audience nearby
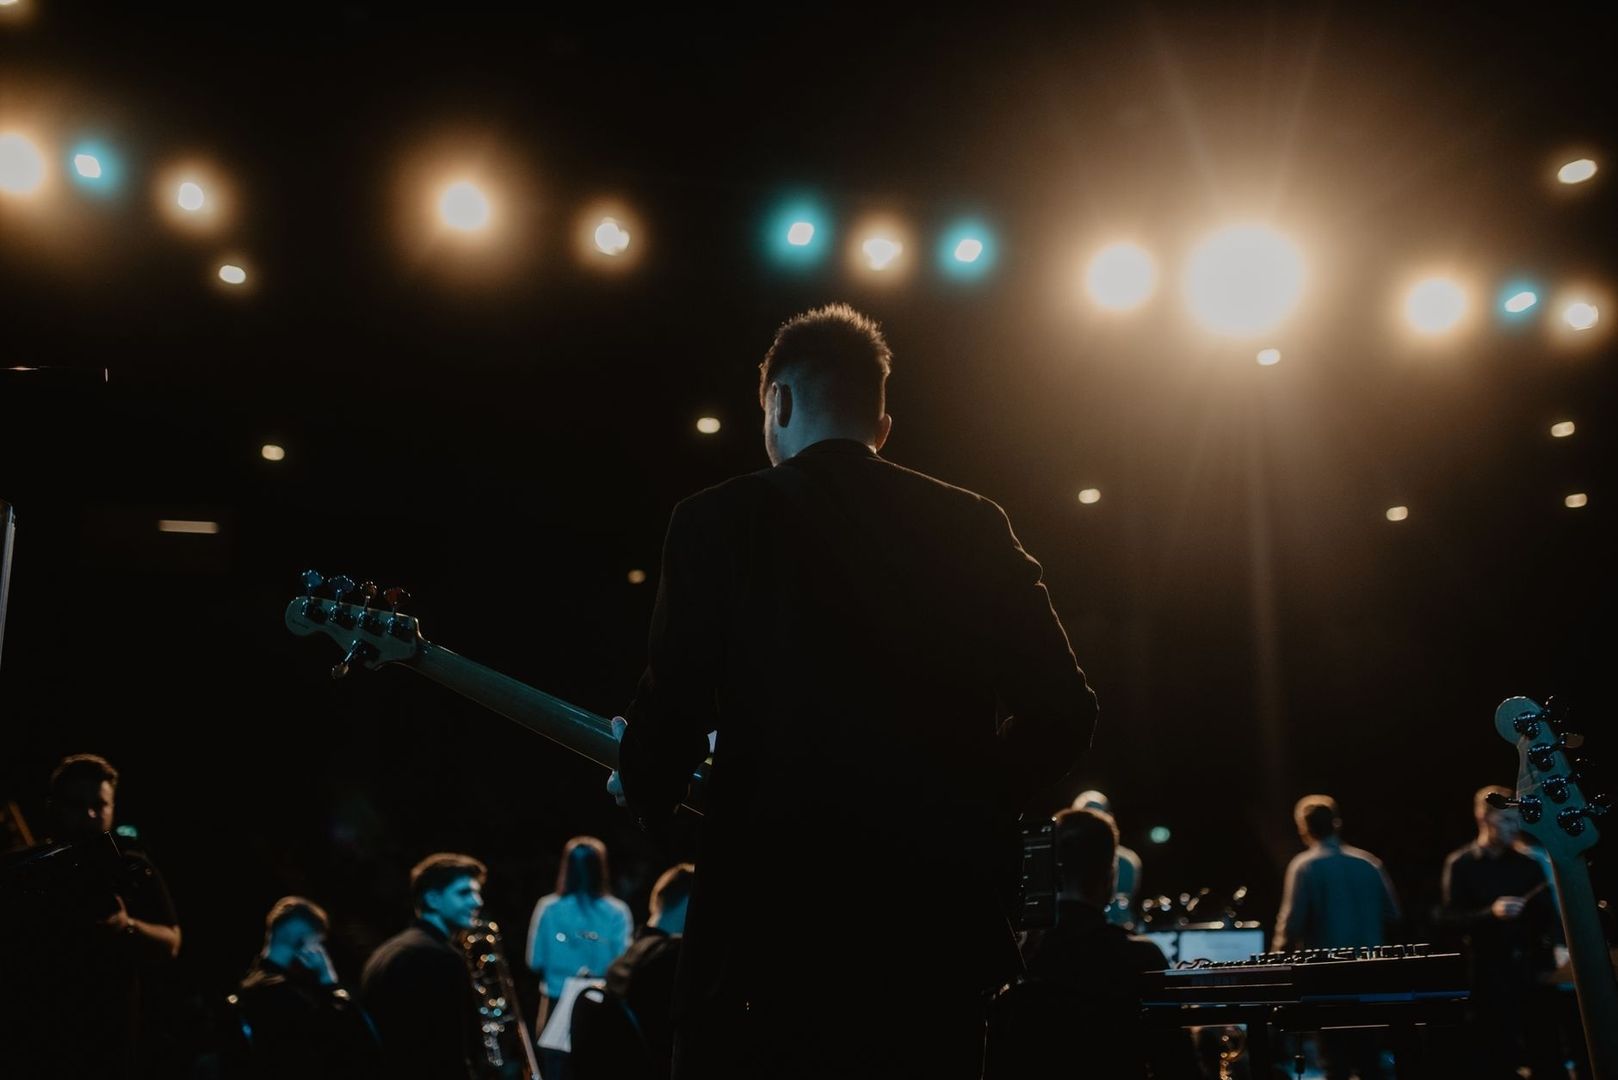
Backstage preparation works best when rising arousal is given a clear physical sequence to follow.

Resetting the Nervous System with the Physiological Sigh

Stage fright often begins with shallow chest breathing. Rapid, incomplete breaths can make the body feel starved of air even when oxygen levels are adequate, while carbon dioxide can accumulate enough to intensify dizziness, tingling, and tremor. A physiological sigh offers a discreet mechanical reset. It uses two consecutive inhalations followed by one long exhalation. The first breath expands the lungs; the shorter second breath helps reopen air sacs that may have collapsed during shallow breathing. The extended exhale then reduces respiratory drive and encourages the body to move away from escalating alarm.

This is not about taking the biggest breath possible. Overly forceful breathing may make light-headedness worse. Keep the action controlled and quiet, with the shoulders relaxed and the exhale noticeably longer than either inhalation. Understanding how rapid respiratory adjustments halt nervous tremor gives performers an immediate anchor when the body begins to race.

  1. Inhale gently through the nose.
  2. Take a second, smaller inhalation before exhaling.
  3. Release the breath slowly through the mouth, allowing the exhale to last roughly twice as long as the combined inhale.
  4. Repeat the sequence for five to ten cycles, taking approximately 90 seconds.

During the final few cycles, notice whether the exhale is becoming smoother rather than chasing a particular feeling. The goal is not instant serenity. A reduction in breath urgency, shoulder tension, or hand tremor is enough. If nasal breathing is uncomfortable because of congestion or the demands of a costume, use gentle mouth breathing without straining. Anyone with a respiratory or cardiovascular condition should adapt the exercise conservatively and follow medical guidance.

Tactile Anchoring to Escape the Mental Echo Chamber

Adrenaline can pull attention entirely inward. Instead of seeing the room, you monitor your pulse. Instead of hearing the conversations around you, you replay a possible error. This mental echo chamber makes the backstage environment feel unreal and deprives the brain of useful spatial information. Tactile anchoring interrupts that loop by giving attention a simple, neutral task in the present environment.

Professional speakers and stage artists rely on physical stabilization cues before stepping into the spotlight, often through repeatable routines rather than dramatic motivational rituals. Elite divers, for example, use carefully sequenced thoughts and actions to regulate attention, pace, emotion, and behavior before performance. A backstage version can be small enough to remain invisible.

  • Press both heels firmly into the floor for three seconds, then release without locking the knees.
  • Touch the edge of a lectern, instrument, costume seam, or prop and identify its temperature and texture.
  • Press the thumbnail lightly into the side of a finger, using pressure that is clear but never painful.
  • Notice one stable visual feature, such as a doorway, floor mark, lighting stand, or curtain fold.

Use a three-point sensory check when thoughts begin spiraling. First, identify three things you can see. Second, notice two physical sensations, such as the shoes against the floor or the fabric at the wrist. Third, listen for one sound at a comfortable distance. Then add one deliberate movement, such as lowering the shoulders or turning the head slowly. This sequence re-establishes the body as a participant in the room rather than a problem to be analyzed.

Choose cues that can be repeated in rehearsals and on performance days. A heel press before the first sentence, a thumb-to-finger contact before a vocal entrance, or one touch of the instrument before playing can become a reliable threshold signal. The cue does not need mystical meaning. Its value comes from consistency, which reduces the number of decisions required under pressure.

Re-labeling Adrenaline from Panic to Readiness

Once the body is activated, the mind tries to explain the sensations. A racing heart can become “I am losing control,” while sweaty palms become “Everyone will notice.” That interpretation may increase threat perception and consume working memory. Research by Alison Wood Brooks at Harvard Business School found that anxiety and excitement share a high-arousal physiological profile. In studies involving singing, public speaking, and mathematics, participants who said “I am excited” performed better than those instructed to force themselves to feel calm. The original Harvard research on excitement reappraisal supports a practical point: arousal is often easier to redirect than to suppress.

Forcing calm can feel false because the body is clearly not calm. That mismatch creates another performance demand. Re-labeling keeps the energy while changing its meaning. Say the phrase silently or aloud in a steady voice: “This is readiness.” “The energy is available.” “I am excited to begin.” The statement should be believable, not inflated. The aim is to move from a threat mindset, in which the audience is judging you, to an opportunity mindset, in which the audience is waiting for useful information, music, or a story.

Automatic interpretation Performance-oriented pivot
My heart is racing, so something is wrong. My body is increasing energy for the opening.
My hands are shaking and everyone will see. My hands are activated; steady contact will guide them.
I might forget everything. The first line is the only task required right now.
The audience is waiting for failure. The audience is waiting for clarity, value, or connection.

Use one label consistently for the final minutes. Repeating five different affirmations can become another form of mental noise. A concise phrase paired with a physical action works better: press the heels down and say, “Ready to enter.” The phrase is not a demand to feel fearless. It is an instruction about how to use the existing state.

Unlocking the Vocal Mechanism and Jaw Tension

Stage fright commonly tightens the structures that support communication. The masseter muscles may clench the jaw, the tongue may pull backward, and the soft palate may become less mobile. Performers can then experience a constricted throat, a dry or thin sound, difficulty articulating, or a voice that feels disconnected from the breath. These reactions are understandable: the body is preparing for action, but it is prioritizing survival-style muscle readiness over nuanced vocal control.

Backstage release should be gentle and silent. Let the jaw drop as if beginning a quiet yawn, keeping the teeth separated and the lips soft. Extend the tongue forward for two or three seconds, then let it rest. Repeat without stretching aggressively. A sub-audible hum can provide light vibration through the lips and face, but it should never become a forceful vocal warm-up. Musicians and speakers can also use a silent “ng” position, feeling the tongue arch without squeezing the throat.

  • Separate the teeth and make two slow, relaxed jaw drops.
  • Roll the shoulders once backward and allow the neck to lengthen.
  • Extend the tongue gently, release it, and repeat twice.
  • Use a quiet hum or imagined hum for three relaxed exhalations.
  • Touch the tongue tip lightly to the ridge behind the upper teeth, then swallow normally.

The final tongue-tip contact can stimulate saliva production and remind the mouth to stay mobile. Keep water nearby and take small sips rather than repeatedly gulping, which can create more throat awareness. Avoid chewing gum immediately before speaking or singing if it encourages jaw activity. The target is not a perfectly loose face. It is enough freedom for the first phrase to emerge without fighting unnecessary muscular resistance.

The Five-Minute Sequential Countdown Routine

A reliable countdown reduces improvisation at the exact moment when attention is most vulnerable. Elite athletic routines are rarely built around a single inspirational thought. They combine physical preparation, attention control, pacing, and a repeatable sequence. Research on elite divers similarly describes pre-performance routines as organized behaviors that regulate thoughts, emotions, and actions across distinct stages. A performer can borrow that logic without copying a sport-specific ritual.

Keep the routine short, quiet, and portable. It should work in a conference room, a theater wing, a green room, or the side of a stage. The sequence below assumes five minutes remain, but it can be compressed if a stage manager, host, or musical cue changes the timing.

  1. Minute five, discharge excess tension. Stand with feet hip-width apart. Shake out the hands, loosen the wrists, roll the shoulders, and bend the knees twice. Avoid frantic movement. The purpose is to prevent adrenaline from becoming rigid posture.
  2. Minute four, establish contact with the room. Press the heels into the floor, feel the prop or lectern, and complete the three-point sensory check. Look at one fixed object and let the eyes move slowly rather than darting around.
  3. Minute three, regulate the breath. Perform five to ten physiological sighs. Keep the exhale long, quiet, and unforced. If the breath becomes uncomfortable, return to ordinary breathing and simply lengthen the next few exhalations.
  4. Minute two, release the vocal channel. Drop the jaw gently, relax the tongue, take a small sip of water if needed, and use a soft hum or silent resonance exercise. Rehearse only the first phrase, not the entire presentation in your head.
  5. Minute one, project purpose. Say one believable readiness statement, then visualize the first thirty seconds in practical detail: where the eyes will land, how the feet will feel, and what the opening sentence will sound like. Finish with the chosen tactile cue.

The most important part is the entry threshold trigger. Choose one action that occurs immediately before crossing the curtain line or walking to the microphone. It might be a heel press, a thumb-to-finger touch, one slow exhale, or a brief look toward the first audience section. Pair it with a compact instruction such as “Begin with connection” or “Deliver the first point.” This trigger should not ask for confidence. It should direct behavior.

Once on stage, protect the first thirty seconds from unnecessary speed. Plant the feet, take the first usable breath, and allow the opening phrase to finish before accelerating. For speakers, that may mean looking at one receptive face or one section of the room. For musicians, it may mean feeling the instrument”s contact points before entering. For performers, it may mean taking one deliberate beat in the light. The first moments are not a test of whether fear has vanished. They are the bridge between preparation and participation.

Step Out and Claim the Space

Stage fright is raw fuel waiting for direction. The pounding heart, heightened attention, and muscular readiness are not automatically enemies. They become disruptive when they are interpreted as proof of danger and left without a physical channel. Breath regulation lowers the escalation, tactile cues restore spatial awareness, vocal releases remove mechanical interference, and re-labeling turns alarm into usable readiness.

The objective is not to eliminate fear before every performance. It is to control the state well enough to act with precision while fear is still present. Own the first breath, the first movement, and the first thirty seconds under the lights. Once the performance has begun, attention can move outward toward the audience, the music, the message, or the scene. The body may still be energized, but it is no longer waiting for danger. It is doing the work it came prepared to do.